
Page 17 - Summer 2017 GMC Vintage RVing
P. 17
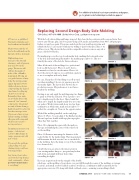
For additional technical session presentations and papers, go to gmcmi.com/technical-presentations-papers/455 motors as published. Alternative dipsticks need level verification if installed.Many owners run the oil level at the add mark on the dipstick, with no downside.High mileage wear increases some internal clearances, and oil pressure may read low on thegauge. The motor willstill run thousands ofmiles, if the oil level is maintained. Moving upto a grade heavier oil may make the pressure gauge appear happier, however thicker oil moves slower, compounding the elapsed time frame for oiling up the motor at start up. Remember these unitsare not daily drivers that retain oil “wet” internal components. Occasional use and oil drain down go hand in hand. It is a known fact that start-ups create90 percent of motor wear. Instant starting and high idle rpms will compound the dry start scenario –not in your favor.In summary, monitor your gauges – take instant action to any changes in temps, pressures and odd new sounds.If you catch the problem early, pulling over and shutting down could save you mega dollars.Last but not least, take a cue from the long distance truck community – where preventive maintenance is everything!Replacing Second Design Body Side MoldingCliff Golby | 407-859-9000 | Golby Motor Corp. | golbymotorcorp.comWith the body side molding and lamps removed, first clean the base extrusion with soap and water then remove any old tape, glue, and loose paint. Using a DA sander and anywhere from 80 to 220 grit paper, feather out any loose paint. If you were anal about this you would epoxy prime andrefinish the base. I can’t seem to find anyone willing to pay for that procedure so wewill use it as is. Wipe down the base with a compatible solvent to remove any oils or grease. Alcohol works fine.Put masking tape over the top of each marker hole, marking the horizontal center of the hole and transferring that mark to the masking tape (photo 1). This is to identify the center of the hole for future reference.PHOTO 1PHOTO 3PHOTO 5PHOTO 7PHOTO 9PHOTO 11Miter all the ends of the moldings for a professional look (as did the factory). Photos 2 and 3 show a homemade tool used to cut the miters. Photos 4-6 show the end cut. I suppose one could draw a pattern to use as a template and cut by hand.For ease, I keep the roll of molding on a roll-around cart when installing. I do not cut separate pieces for the marker lights. The factory did, but was due to production reasons. My preference is to not have a break in the molding.Starting at any end, apply the molding using two fingers to guide it down the extrusion. Note: I prefer to notcut to length except for the door. I have found that when cut to length, the length usually does not come out perfect. Work it down until about two feet from termination at which time, mark and cut (photo 7) – scribed for a straight cut. Now cut the opposite miter.With all the molding installed, cut the end plugs (photo 8). Photo 9 is a mockup of the finished product. The end caps have double sided tape plus super glue where they butt together.Photo 10 is aligning the square with the mark on the tape and marking the center of the socket hole on the molding.Photo 11 illustrates measuring the diameter of the socket holder for the marker lamp. That measurement will determine the hole saw size I use to cut the hole in the molding. (I put the lamp on top of the molding for a cleaner look.)I doubt that you can remove the rusted screws in your existing marker lamps so, just grind any broken stub down and simply drill new holes when reinstalling the lights.PHOTO 2PHOTO 4PHOTO 6PHOTO 8PHOTO 10If you are in question about the strength of the doublesided tape, on the molding of your choice, you can drill through the center of the molding, at strategic locations, and install screws for added security. I would use a combination drill/countersink for the appropriate screw size (#8) along with black oval head screws – assuming your molding is black.SUMMER 2017 GMC MOTORHOMES INTERNATIONAL 17
