
Page 14 - Summer 2017 GMC Vintage RVing
P. 14
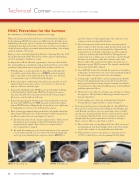
Technical Corner MAINTENANCE, PARTS, TIPS, INNOVATIONS AND MOREHVAC Prevention for the SummerKen Henderson | 1976 Birchaven | Americus, GeorgiaWhen’s the last time you removed the front cover from the Heat, Ventilation, Air Conditioning (HVAC) box under your GMC’s front hoods? Unless it was within the past few years, by you or someone else, I will guarantee you there is something in there that needs attention. If you have not done it personally, you should, because it will give you a much-enhanced understanding of the working (and non-working) of the system.Before you start, you should obtain the publication “Separating Hot from Cold” by Zay Brand from the GMC Western States website (gmcws.org/blog/?page_ id=2127) and study it. I will refer to it later.Looking in there will also afford the opportunity to clean out collected debris, dirt, and miscellaneous contaminants (such as squirrel and mouse nests) which steal away cooling (which cannot be spared). Here is what you need to do:1. Withtheenginecool,disconnectthetwoheaterhosesattheupperleft (as would be seen from the driver’s seat – ALWAYS) and position them high so only a little coolant leaks from them. The heater core will drain, so you may want to put a catch basin beneath the pipes.2. Removetheradiatoroverflowtankattherightfront;itjustliftsoutofthe bracket. It may be necessary to remove one or two hoses to position the tank out of the way toward the right.3. Removethewindshieldwasher(WSW)reservoir(withpump)bylifting it off of its bracket at the left of the HVAC box. It may be necessary to disconnect the rubber hose; the electrical wire should be long enough to allow you to stow the tank out of the way.4. Removetheapproximately10sheetmetalscrewsattachingthecoverfrom the front of the HVAC box. It is NOT necessary to remove the overflow tank and WSW brackets. Manipulate the loosened front cover, (which may be stuck in place) to remove it out of the under-hood space.5. Photo 1 shows approximately what you should see. Hopefully without the debris, but probably with some. This box had previously been opened and modified or repaired; here are some things to be aware of:A. The brass item at the left, the “thermo-expansion valve”, which controls the expansion and consequent cooling of the refrigerant, has been changed from the original. There’s also a loose connection there,but it’s apparently not required.B. Thesmalltuberunningacrosstheboxbottominfrontoftheevaporator is not mounted properly: It is loose from its two nylon mounting clips and its tip is not embedded in the evaporator where it MUST be toperform its function of detecting freezing of the evaporator so the compressor can be automatically shut down.C. Above the evaporator at the bottom, there is an opening which allows cooled air to flow into the cockpit. Just above that, below the heater core at the top, there’s a horizontal door. Operated by the temperature lever on the dash control, there is a cable connectedto that door at the left end of the HVAC box. Moving the lever positions that door to deflect some (or all) of the cooled air through the heater core and then to either the foot heater outlet or the defroster outlets. The condition of the rubber seal on that door is important to proper HVAC operation. The original is usually badly deteriorated and should be replaced.D. Since all HVAC air must flow through the evaporator, its cleanliness is imperative. You may want to use some cleaner specifically designed for such cleaning – be sure it’s safe for use on aluminum.E. AtthefarrightoftheHVACboxistheairplenumfromwhichthe blower is fed; dependent upon the year model of your A/C, there may be provisions there for using external or internal (recirculated) air. Some ideas for improvement modifications are in the Zay Brand publication mentioned above.F. The plastic bottom of the box sometimes sags, allowing air to bypass the evaporator. The Zay Brand technical paper describes repairs for that and other defects.G. Look everything over, clean it up, and understand its function. You may find more improvements no one has thought of.6. NowremovetheblowermotorfromtherightsideoftheHVACbox. There are about six sheet metal screws holding it to the fiberglass duct work. Beneath one of those screws is a ground wire; that is a trouble spot since it is the only ground for the motor and it is mostly screwed into an insulator. Beneath another is a noise suppression capacitor through which the positive current flows to the motor, through a Faston connector. Here are some things to look for:A. Photo 2 shows what you may find in the blower. That one was not moving much air. Very heavy buildup of dirt on the blower blades can also affect volume. So can mud dauber nests built there.B. While you have it out, it is a good idea to connect the motor to 12 VDC to check for free, noise-free running. Hold it tightlyPHOTO 1: Open HVAC Box PHOTO 2: HVAC BlowerPHOTO 3: Blower Duct14 GMC VINTAGE RVING MAGAZINE | GMCMI.COM
